


Policy | Activities, Attachments and Alerts


Policy | Activities, Attachments and Alerts
Modular Solutions | Policy Module | Client Resource
Activities
Activities are a feature in the platform to provide reminders or abeyances, as a follow up.
There are some permissions relating to Activities.
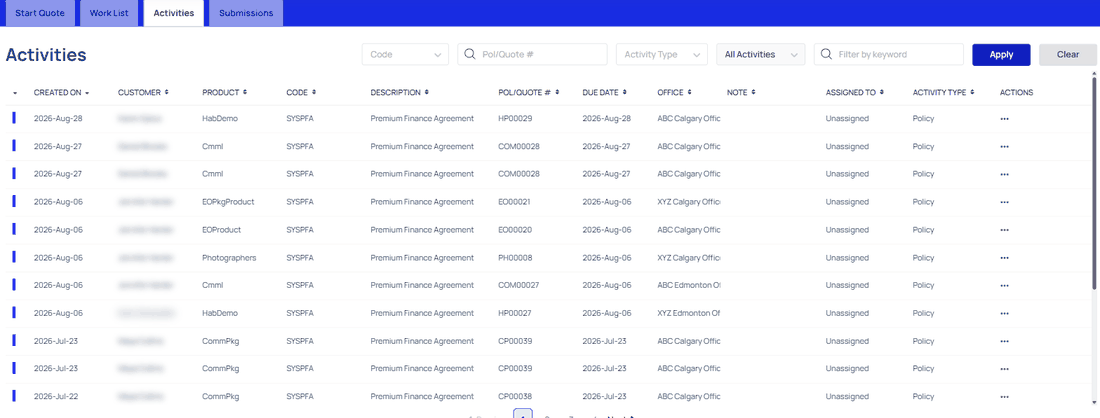
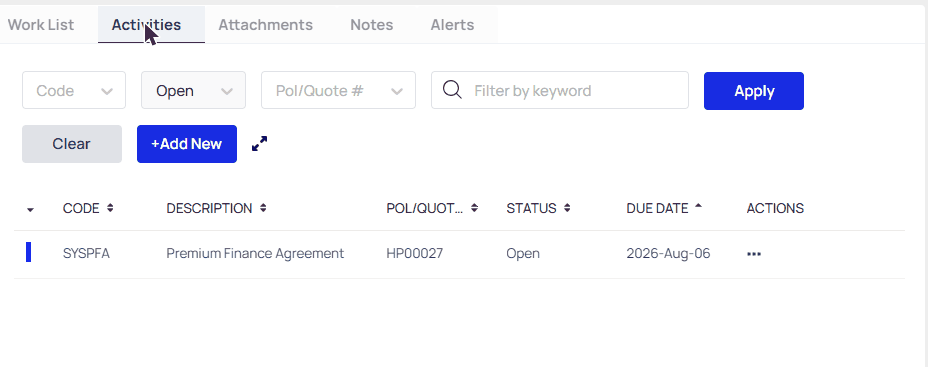
Activities are available to access from the Activities Overview (the tab beside Work List) in the Policy module and from within each Customer Profile.
Activity tab view from the Activity Overview screen:
Activity tab within the Customer Profile screen:
Many activities are system generated, but it can also be useful to manually add an activity.
Activities Overview tab
When Users are working in the platform, to view the Work List and Activities, they will select the Policy module. Think of these two tabs as being the Overview and 'main' screen for all Work for you and your team.
The Activities Overview tab is next to Work List at the top of the screen.
From this screen, and depending on permissions, Users will be able to view the following:
- My Activities
- Unassigned Activities
- Others Activities
- Role Activities
- Role Group Activities
- All Activities
My Activities- these are User specific activities that are assigned to you. You will be able to view them and see them but others might not be able to from this Overview screen.
Unassigned Activities - these are Activities not assigned to any User yet and, are therefore, outstanding work that is 'available' for Users to assign to the team member or to themselves to handle.
Others Activities - These are Activities that are assigned to other Users.
Role Activities - These are Activities assigned to a Role, using the Assign To options.
Role Group Activities - These are Activities assigned to a Role Group, using the Assign To options.
All Activities - These are all of the Activities that are not Closed.
Workflow Tip!
Use the Filter within the Activities tab to find the related Activities that you may want to work on OR perhaps to assign them to other Users. For example, if you want to assign all Claims Activities to one of your Claim Specialists, you can filter by the code that your organisation uses for Claims, the filter then applies and will show you only those types of Activities and you can easily assign to the correct User from there.
Manually Add an Activity
This can be done from the Customer Profile screen. View Clip Here.
- Go to the Customer Profile that you want to add the activity.
- Click on Activities tab.
- Click + Add New.
- The Add New Activity modal opens and the information fields can be completed.
- Select Save once you have finished adding all details you require.
Activity fields explained:
Here is an example Activity:
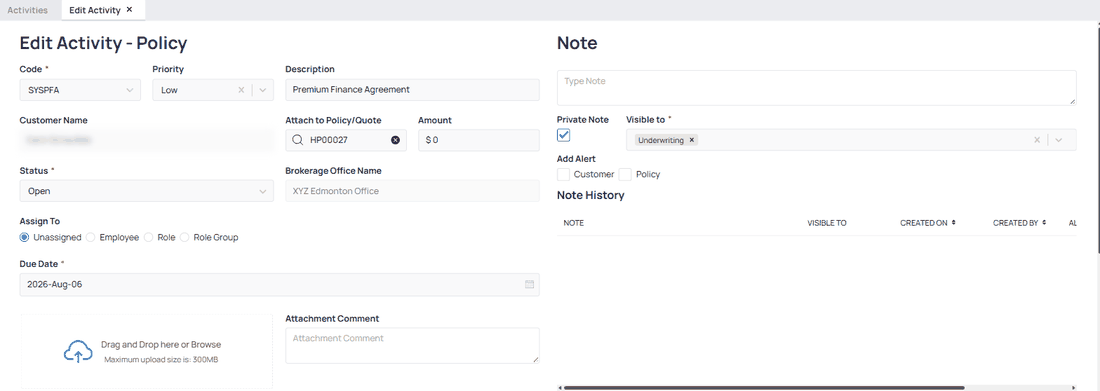
All of the fields in the activity are set to Sort and Filter, so pick what is most appropriate for the Activity that you are creating.
- Code -The list of codes is defined by your organisation. Pick the code that associates with the activity that you want to create.
- Priority - It defaults to None. The priority may be automatically defaulted when the code is picked, if defined by your organisation. But you can change the priority, if needed, and pick the option from the dropdown menu. The priority is reflected by a colour in the main Activities tab, like Red for Urgent or Blue for Low, like here:

- Description - This description will show in the Activities overview screen for quick reference on the Activity. The description may be automatically populated when the Code is picked, if defined by your organisation, and you can edit it.
- Customer Name - This will be greyed out and only display the customer name.
- Attach to Policy/Quote - Type in the Policy or Quote number that the Activity is for. Start typing the number and options will appear for that customer.
- Amount - Appears once the activity is attached to a policy or quote. Use it to note a premium that relates to a particular transaction or amount.
- Brokerage Office Name - Appears and prefills with the brokerage when the activity is tied to a quote or policy number.
- Status - This list is defined by your organisation. The activity might default to Open, for example, but you can choose another Status if this better reflects why you need it. Depending on the status you choose, you may be given an additional Reason field to complete. An example might be if you chose Close Status, you may be asked to pick a Close reason.
- Assign To - Choose how the activity is routed using the radio options: Unassigned, Employee, Role or Role Group. Unassigned leaves it on the Unassigned list for anyone to pick up. The options available under Employee, Role and Role Group are defined by your organisation, so speak to your Digital Champion if someone is missing.
- Due Date - Will default to the current date. You can select from the calendar in this field to move it.
- Drag and Drop field - Drag and drop a file here or browse to it. The maximum upload size is 300MB. You can add as many files as you want within that limit. If a file type is not accepted, an error is displayed when you try to upload it.
- Attachment Comment - This will allow you to provide a comment for the attachment, for clarity on what the attachment is. For example, the file name might be generic, but a comment identifies the attachment better when among others in the Attachments tab, shown here:
- Private Attachments - Tick this to restrict who can see files added to the activity. When it is ticked, Visible to becomes required and you choose which groups can see them.
- Note panel - On the right of the form you can add a Note. Private Note restricts it in the same way, with its own Visible to list, and Add Alert lets you raise an alert against the Customer or the Policy at the same time.

You will also see that this modal includes the User name for who created the activity along with the time and date it was added.
As you know, you can add as many attachments as you want, within the capacity of the feature, but you can only add one comment for all of them in this section. You CAN individually change the names of the attachments, by going into the Attachments tab, and using Edit (further details are outlined in the Attachments article).
Workflow Tip!
Create a list for your team of what Activity Code they should use for what purpose AND the Status you should use. This will create efficiencies on them being handled by the correct team or user and in a timely manner.
All updates to an activity will show within the body of it, such as:
- Created on date.
- Updated and/or Closed date
- The user who performed the action on it.
- Time and date of action.
Filter features in Activities
From a Customer Profile you can filter by Activity Code, Status, Pol/Quote # and a keyword. On the module-level Activities tab the filters are Activity Code, Pol/Quote #, Activity Type, a scope selector (My, Unassigned, Others, All) and a keyword.
Using Clear, will clear those filters from the Activities tab.
Activity Actions
From the Actions icon you can perform certain actions on that Activity, such as Edit Activity, Assign and Close Activity.
Click the Actions ellipsis (3 dots), from the Activities tab, to open that menu.
Attachments
Attachments can be added to an activity that is already in the platform, or by Add New Activity or by Add New Attachment.
Attachments added in the Underwriting system will be visible to Users in Gateway (Broker Portal).
Attachments are validated on upload and the maximum file size is 300MB. Error verbiage will display if the attachment is not accepted.
Use the expander to expand the attachment section and then you can view more information about those attachments and perform further actions on them, like download, edit or delete.
Here is how to perform those actions:
Add New Activity
See Manually Add an Activity, in the Activities article above.
Add New Attachment
View User Clip here on how to Add a New Attachment, Edit, Download and Delete.
Add Attachment to existing Activity
Attachment Actions
- Go to the Attachments tab.
- Expand the Attachments list.
- Click The Actions ellipsis (3 dots) next to the attachment that you want to work on.
- Click Download if you want to download the attachment to export.
- Click Open Activity if you want to open the activity that the attachment is associated with (if associated with an Activity, option will not appear if not).
- Click Edit Attachment if you would like to edit or correct some of the information in the attachment details (doesn't edit the attachment itself but it edits the description of the Name and Comments). For example, if you had multiple attachments under one Activity and now you want to individually name them Edit will be the option to choose.
- Click Delete Attachment to delete the attachment from the Customers Profile.
Alerts
From within an Activity, you can add an Alert to the Customer Profile or a specific Policy.
The Alert feature allows you to provide an 'alert' on the Customer profile or Policy level to highlight something for all users to be aware of, like a digital sticky note.
The Alert will stay on the profile even if the Activity is Closed.
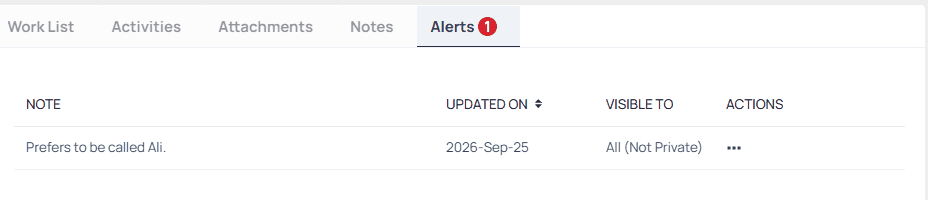
In the example below, we can see that the customer prefers to be called Ali, so we add an Alert so that anyone in the file can see that information. We would add that to the Customer as an Alert, not just a policy, as it is relevant to all.
When the Customer Profile is opened the Alert is visible and when you click on the Alert tab, the Note can be viewed:
Add an Alert
Or
+Add New Activity and complete the Note fields on the right side of the screen, including the Add Alert field, like here:

As noted before, the Activity can be Closed and the Alert will still be 'active' on the profile.
Close an Alert
Or
The Alert can be Closed, using the Actions ellipsis (3 dots).
- Go to the Alerts tab.
- Click the Action icon for the Alert.
- Click Open Activity.
- Under the Note History section, pick the Actions ellipsis again (3 dots).
- Click Manage Alerts and uncheck the box that is checked for this alert.
- Save to exit the modal.

